- Why are there so many songs about rainbows?
- And how to locate one with a bit of simple physics, maths and home-craft
- Maunder and Hunt’s Very Fabulous Rainbow Position Locator*
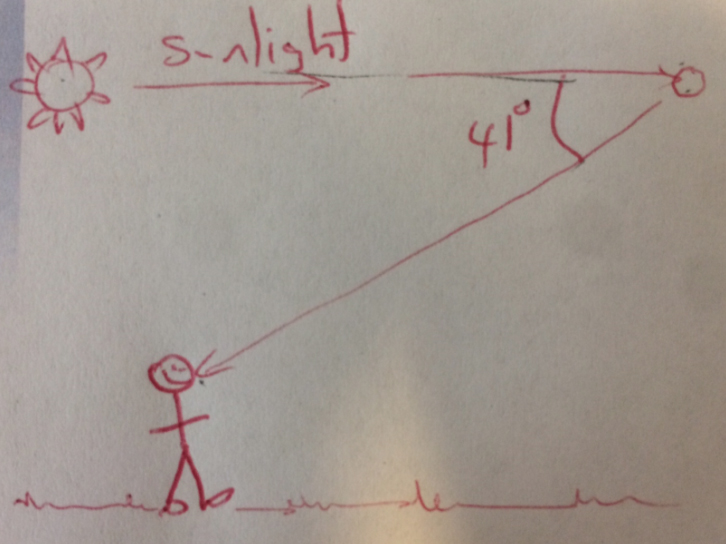
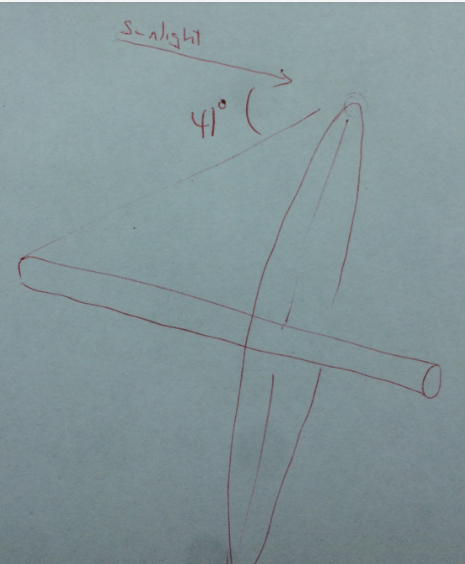
Figure 1: A rainbow forms at angle of 41° from incident sunlight.
There’s something quite fascinating about rainbows, which is why they feature in so many wonderful legends and myths, from the Bifrost bridge of Norse legend, to God’s reassuring post-Flood sign, to the source of leprechauns’ gold.
For scientists, rainbows are a beautiful, visible manifestation of relatively simple optical physics, based on refraction, reflection, and maths. With a couple of threaded steel bars and a poster tube you can construct a tool that at its simplest shows where a rainbow will form, but also ‘opens your eyes’ to hidden, lovely symmetries in every rainbow.
You probably know that a rainbow forms when the sun is behind you, and is low in the sky. And you may have inadvertently created rainbows when spraying a hose in bright sun in your backyard.
You may not know that the same precise mathematical relationship predicts where each rainbow forms, whether ‘natural’ rainbows in the sky or ‘artificial’ in your backyard. And that with the right tool you can precisely predict the location of both natural and artificial rainbows.
Here’s the key: a rainbow forms at a position when the angle from your eyes to the rain and back to the Sun is precisely 41°
(In fact a rainbow’s coloured bands cover a small range of angles, from 40° (red) to 42° (blue), but for simplicity we’ll refer to the centre of that band: 41°).
Let’s talk about maths, baby
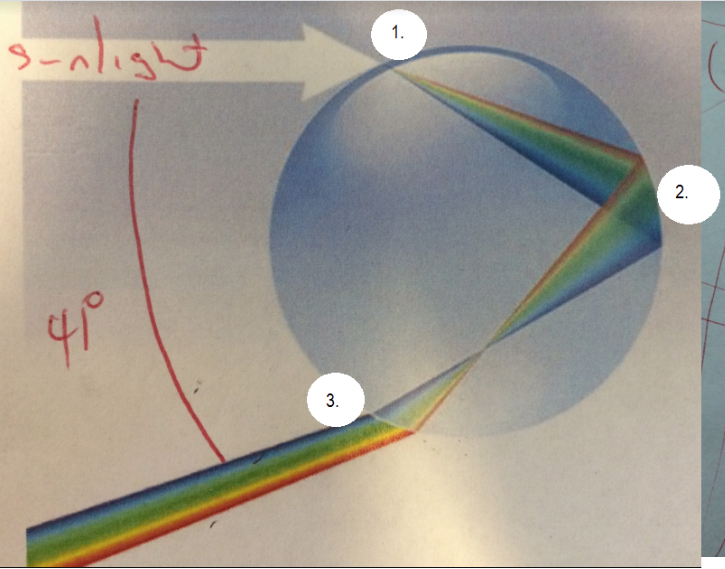
When light from sun hits a raindrop, it (1) refracts (bends) as it enters, (2) reflects off the back of the drop (3) refracts again as it exits.
All together, that creates a reflecting ray at 41° ** to the incident ray.
(** Ignoring the different angles of different frequencies.) Thanks to BOM for the original image.
Figure 1 illustrates that statement: a rainbow forms when the angle from your eyes to raindrops and back to the Sun is precisely 41° .
Figure 2 shows what’s happening inside every spherical raindrop: sunlight enters the sphere and [1] refracts (bends), then [2] reflects off the ‘back’ of the raindrop, then exits the front of that raindrop, [3] refracting a second time.
For any raindrop, the angle between the light entering the sphere and exiting again will always be 41°.
So if you’re standing on the ground looking up at the sky, and there are raindrops at the right position such that the angle from you to them to the Sun is 41°, ka-pow! Rainbow-time.
Moral of the story: a rainbow forms at an angle of 41° from incident sunlight.
Extra for experts:
- Why the colours? As you’ll see in figure 2, colours refract at different angles. Blue light will reach your eyes from a set of raindrops slightly lower in the sky than red light, so the rainbow will have an inner blue band and an outer red band.
- Everybody sees a different rainbow! (Your friend or sibling standing next to you is looking at reflected rays from a slightly different set of raindrops!)
- You can still see a rainbow when the sun is high, if you spray the garden hose and look down (see the surprised-looking bloke in figure 3).
How do I detect a rainbow
You need to build a tool that shows you exactly where in the sky is 41° from incident sunlight.
Figure 3: Surprise! When the Sun is high, you can spray a garden hose to reveal a rainbow low to the ground, as long as you maintain an angle of 41° from incident sunlight.
- hoola-hoop
- poster tube
- 2x M6 steel rods (length: longer than the diameter of the hoop)
- 12 M6 nuts
- drill, tape measure, Stanley knife, brain.
Using a poster tube and hoola-hoop you can create a viewing ‘template’ at the correct angle.
To create a triangle with a viewing angle of 41°, measure the radius (R) of the hoola-hoop and calculate what horizontal length (H) is needed to create a ratio of 0.87 to one (tan 41° = 0.87). Ie, H = R/0.87.
[If your student is capable of doing the trigonometry, delete this from the instructions so they can calculate it themselves.]Our hoola-hoop radius (R) was 393mm so we needed a horizontal axis length (H) of 451mm.
Measure the distance R from one end of the poster tube, drill four equally spaced holes of appropriate size to thread the steel rods (actually, offsetting alternate holes about half the width of the bar allows them to cross nicely). Thread your two steel rods through the holes at right angles. Secure with nuts.
Drill four holes through your hoola-hoop, thread nuts on the steel rods, then the hoola-hoop, then secure with nuts. Check its central with a tape measure.
Carefully cut a ‘viewing window’ at the end of the tube, so the hoola-hoop is visible with the tube pressed against your eye like a telescope. (Leave a narrow band of cardboard at the opening, for strength.)
Using the tool
With the tube parallel to rays from the sun, and the eye at the left-hand end, the angle from eye to hoola-hoop is 41 degrees
With the Sun in the sky behind you, get a friend with a hose to spray water in the air, so you can form a rainbow to observe. (Get them to put one thumb over the end of the hose to create small droplets.)
To align the tube with the Sun, look through the tube and align the ‘cross hairs’ of the two steel rods with the shadow of your own head.
Without moving the tube, look up through the ‘viewing window’ to see that the hoop aligns with the rainbow formed by your friend with the hose.
As you move your eyes to look around the circumference of the hoola-hoop, you are maintaining the same 41° angle. This is why rainbows form a circle! As long as the angle between sun, raindrop and your eye is 41°, it works.
Note the eyepiece must be firmly against the eye, as otherwise the distances will be wrong (even wearing a pair of sunnies moves the device slightly away from your eye, so that the hoop will appear to be slightly too small). This is why a ‘viewing window’ is needed (otherwise you need to move the tube away from your eye to be able to see the hoop). Similarly, you need to be lining the device up with the centre of your head’s shadow (where your eye would be).
What do you learn?
That rainbows are cool!
If you’re like us, then rather than just learning the numbers and theory about where and how rainbows form, you’ll find that visualising it and then verifying it experimentally is hugely satisfying. We made genuine whoops of excitement the first time our tool lined up correctly with an observed rainbow.
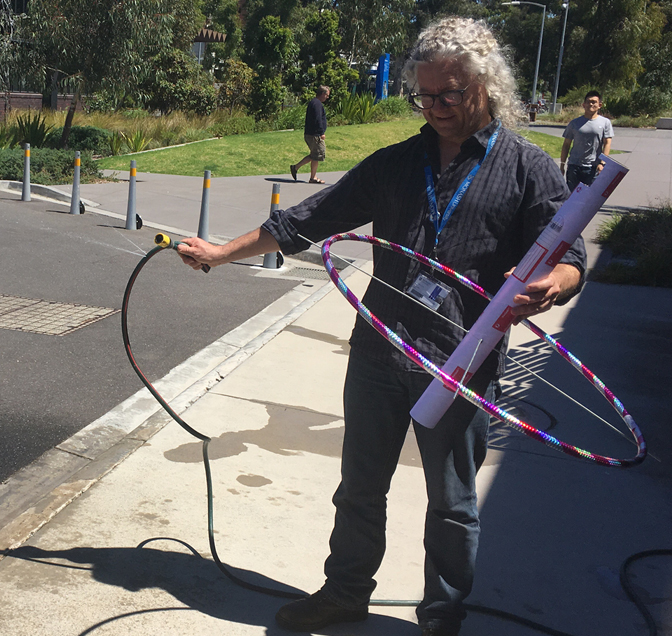
Rainbow tool held with tube parallel to rays from the Sun, hose creating spray (observer absent)
It’s a good way to see how scientific experimentation works. You need to verify the theory and then see what errors might have occurred (in our case, inaccurate calculations, incorrect measurements, poor craft skills, and the lack of a viewing window).
The rainbow detector directly involves you in science by taking a rare and beautiful thing that we all recognise and teaching the science behind it.
How we invented it: the rainbow connection
Long story… We were looking to find the intersection between primary and secondary rainbows: the frequency at which the two overlapped.
You might have observed that when a secondary rainbow is present, the colours are reversed: red on the inside rather than the outside. That’s because a secondary path through a spherical raindrop also reflects back – at a slightly tighter angle of 40° (so it’s visible higher in the sky) and with one extra internal reflection (so that the colours are reversed).
We calculated the frequency of light (infrared) that would overlap between the two rainbows and wanted to create a rig to see if we could measure this in direct sunlight.
In scoping the design of that rig, we realised we needed to verify where our rainbows would form. The rainbow detector (above) was our solution to this problem.
By the way we estimated the rainbow connection to occur at approximately 1800nm. Further, massive, investment is necessary to confirm this theoretically and experimentally.
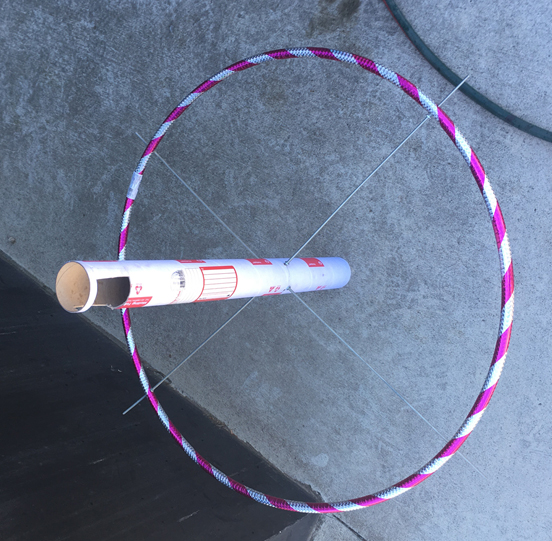
Another view of rainbow tool showing viewing window
—Messers Errol Hunt and Thomas Maunder, physicists and rainbow chasers (* Provisional patent application filed)